Homemade Water Jet Cutting Machine: A Realistic Cost and Build Process Analysis
So you’re thinking about building a homemade water jet cutting machine. It’s a fascinating project that captures the imagination of many makers, small shop owners, and hobbyists. The appeal is obvious: access to a versatile cutting tool without the staggering price tag of industrial equipment.
But is it truly feasible? What does it really take to go from a collection of parts to a functional machine? This article strips away the hype and looks at the practical realities, costs, and challenges of creating a homemade water jet cutting machine. We’ll also touch on when it makes sense to consider a professional solution from an established brand like VICHOR.
Understanding What a Homemade Water Jet Cutting Machine Actually Is
At its core, a water jet cutter uses a stream of ultra-high-pressure water, often mixed with an abrasive garnet, to slice through materials. A commercial machine integrates a robust pump, precise motion control, and a cutting head into one reliable package.
A homemade water jet cutting machine attempts to replicate this functionality using sourced or fabricated components. The goal is to achieve useful cutting capability for a fraction of the cost. It’s important to start with realistic expectations. Your DIY build will likely be slower, less precise, and require more maintenance than a factory-made unit.
For many, the journey of building is as valuable as the final tool.
The Core Components You Cannot Skip
Building a functional homemade water jet cutting machine requires several non-negotiable parts. Each component presents its own sourcing and engineering challenge.
The heart of the system is the high-pressure pump. This isn’t a standard pressure washer. You’ll need a pump capable of sustaining at least 30,000 to 40,000 PSI. Many builders look for used or refurbished intensifier pumps from industrial sources.
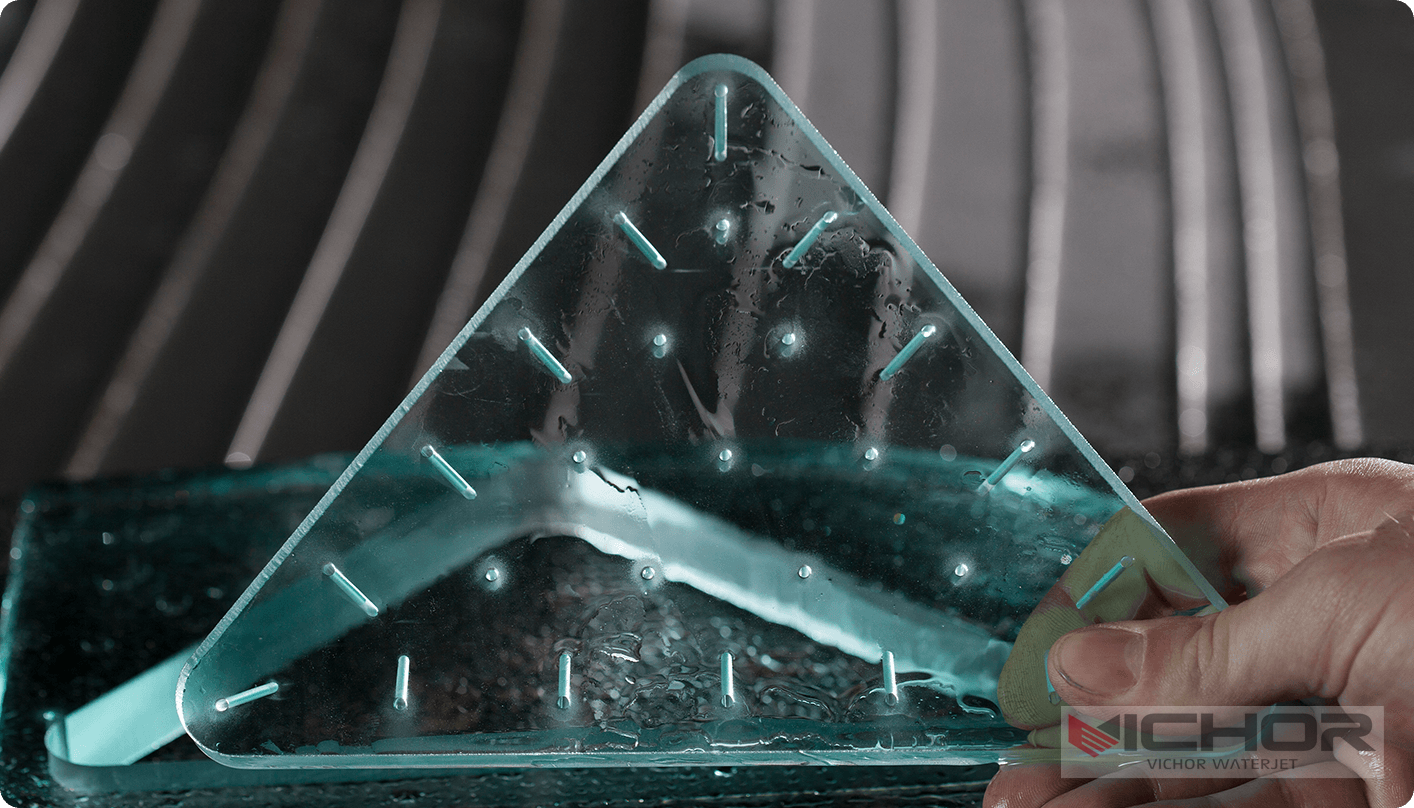
The cutting head and nozzle are critical. This includes a mixing chamber where abrasive is introduced and a focus tube (orifice) that shapes the stream. These parts wear out and must be made from durable materials like tungsten carbide or sapphire.
You’ll need an abrasive delivery system. This involves a hopper, a metering valve, and an air-driven system to feed garnet sand into the water stream consistently.
A motion system moves the cutting head. This is often a repurposed or built-from-scratch CNC gantry system using linear rails, stepper motors, and a controller like Mach3 or GRBL.
Don’t forget the water tank and filtration system. The water must be clean and deionized to protect the pump. A catch tank under the cutting area is also essential to contain the abrasive slurry.
A Step-by-Step Look at the Build Process
Assembling a homemade water jet cutting machine is a multi-stage project. It’s not something you complete in a weekend.
First, secure your workspace. You need a solid, level area with access to power and water. Safety is paramount from day one.
Start by mounting and plumbing the high-pressure pump. Connect it to your water filtration system. This stage involves high-pressure fittings that must be installed correctly to avoid dangerous leaks.
Next, build or assemble your CNC gantry. This frame must be rigid to handle the forces of the cutting head moving at speed. Many builders use welded steel or heavy aluminum extrusion.
Integrate the cutting head and abrasive system onto the gantry. This requires careful alignment. Then, connect everything to the control electronics.
The software setup is crucial. You’ll need to configure your CNC control software to manage the motion, and potentially synchronize it with pump controls.
Finally, begin testing with low pressure and water only. Gradually introduce abrasives and increase pressure as you gain confidence in the system’s integrity.
Breaking Down the True Cost: DIY vs. Commercial
Let’s talk numbers. The cost of a homemade water jet cutting machine is its biggest draw, but expenses can add up quickly.
A bare-bones DIY build, scavenging for used parts, might start around $1,500 to $3,000. This budget often means a slower pump, a basic gantry, and manual abrasive feeding.
A more capable and reliable homemade machine, with a newer pump and a decent CNC frame, can easily cost between $5,000 and $10,000. This includes expenses for fittings, hoses, electronics, and the inevitable “trial and error” parts.
Now, compare this to a commercial machine. An entry-level abrasive water jet from a global brand like VICHOR typically starts around $60,000 to $100,000. This gets you a complete, tested, safety-certified system with software, support, and warranty.
The choice isn’t just about upfront cost. Consider ongoing expenses: nozzle wear, abrasive cost, and maintenance time. A VICHOR machine is designed for efficiency and minimal downtime, which is critical for business.
Material Capabilities and Real-World Limitations
What can you actually cut with a homemade water jet cutting machine? The answer depends heavily on your build quality.
With a sufficiently powerful pump and good abrasive feed, a DIY machine can cut through mild steel, aluminum, stone, tile, glass, and plastics. The thickness will be limited, likely to 1/2 inch or less for metals, and cutting speeds will be slow.
Taper (where the cut is wider at the bottom) can be more pronounced on a DIY setup due to less precise nozzle alignment and stream control. Edge finish may also be rougher.
For intricate artistic work or prototyping on softer/thinner materials, a homemade water jet cutting machine can be perfectly adequate. For production work or thick, tough materials, the limitations become significant.
Critical Safety Warnings for DIY Builders
This cannot be overstated: a homemade water jet cutting machine is a potentially dangerous device. The water stream is invisible and can cut flesh and bone instantly.
Always wear certified safety glasses and hearing protection. Install clear, polycarbonate shielding around the cutting area to contain debris and the spray mist.
Use pressure-rated fittings and hoses well above your operating PSI. Install emergency stop buttons at multiple locations. Never place any body part near the cutting stream, even during testing.
Have a plan for the abrasive slurry waste. It’s messy and heavy. Proper disposal is necessary.
If you are not comfortable working with high-pressure hydraulics and CNC electronics, this project may not be for you.
When to Choose a Professional Machine: The VICHOR Advantage
There comes a point where a DIY project no longer makes economic sense. If you require reliability for daily use, need to cut thicker materials, or have tight tolerances for parts, investing in a professional machine is the wise choice.
This is where companies like VICHOR enter the picture. VICHOR manufactures industrial waterjet cutting systems used in metal fabrication, aerospace, and stone processing worldwide. Their machines offer consistent performance, advanced software for minimizing taper, and robust construction for 24/7 operation.
Choosing a VICHOR machine means you also get technical support, training, and access to genuine parts. For a business, this support network is invaluable and often justifies the higher initial investment.
Building a homemade water jet cutting machine is an incredible learning experience. But for mission-critical applications, the proven technology from established brands is the right path.
Maintenance and Upkeep of Your DIY Creation
A homemade water jet cutting machine will demand regular attention. Expect to spend time before and after each use on maintenance.
Inspect all high-pressure connections for leaks. Check the nozzle and focus tube for wear and replace them as needed—these are consumable parts. Clean the abrasive feed lines to prevent clogs.
Drain and clean the catch tank regularly. Check the water filters and pump fluid according to your pump’s manual.
Lubricate the linear motion components on your gantry. This ongoing care is the key to extending the life of your machine and ensuring safe operation.
Frequently Asked Questions
Q1: What is the most expensive part of building a homemade water jet cutting machine?
A1: The high-pressure pump is almost always the most significant single cost. A reliable new or used intensifier pump suitable for abrasive cutting can cost several thousand dollars on its own, forming the bulk of your budget for a homemade water jet cutting machine.
Q2: Can I convert a regular CNC router into a water jet?
A2: You can use the motion system (gantry and electronics) from a heavy-duty CNC router as a base. However, you must extensively modify it to handle the water, abrasive slurry, and the forces of the cutting head. It must be thoroughly sealed and protected from the highly corrosive slurry.
Q3: How do I deal with the incredible noise?
A3: Water jet cutters are very loud, primarily from the pump and the cutting stream. Placing the pump in a separate, sound-insulated enclosure is highly recommended. Always wear proper hearing protection when operating your homemade water jet cutting machine.
Q4: Is there a community for DIY water jet builders?
A4: Yes, several online forums and hobbyist groups exist where people share plans, troubleshoot issues, and offer advice on building a homemade water jet cutting machine. These can be invaluable resources for sourcing parts and solving problems.
Q5: For a small business, is it ever smart to start with a DIY machine?
A5: It can be a very risky strategy. While it saves upfront capital, the potential for downtime, inconsistent cut quality, and safety liabilities are high. Many small businesses find that leasing or financing an entry-level machine from a provider like VICHOR offers more reliability and professional results, helping them build customer trust from the start.